Difficulty Inserting Hearing Aid: Solutions & Expert Tips
Experiencing difficulty inserting hearing aid devices is a common challenge affecting over 48 million Americans with hearing loss. Whether you’re dealing with behind-the-ear models, in-the-canal devices, or dome-style hearing aids, proper insertion technique and understanding common obstacles can transform your daily experience from frustrating to effortless.
Common Reasons Why Hearing Aids Won’t Go In Your Ear
The most frequent cause of hearing aid insertion problems stems from improper ear canal positioning and anatomical variations. According to 2024 audiology studies, approximately 73% of new hearing aid users experience initial insertion difficulties due to ear canal size mismatches or incorrect device orientation.
Earwax buildup represents another significant barrier, with the American Academy of Audiology reporting that excessive cerumen affects proper hearing aid placement in 42% of users. Additionally, swelling from ear infections, changes in ear canal shape due to aging, or simply using the wrong size dome or earmold can create insertion challenges that require professional adjustment.
Essential Pre-Insertion Preparation Steps
Before attempting to insert hearing aids, ensure your hands are completely clean and dry to maintain device hygiene and improve grip control. Check that your hearing aid battery is properly installed and the device is turned off to prevent feedback whistling during insertion.
Examine your ear canal using a small mirror to identify any visible obstructions or excessive wax buildup. The National Institute on Deafness recommends cleaning ears gently with a washcloth, avoiding cotton swabs that can push wax deeper. Position yourself in good lighting near a mirror, and have your hearing aid insertion tool readily available if your audiologist provided one.
Step-by-Step Behind-the-Ear Hearing Aid Insertion
Behind-the-ear hearing aid insertion requires careful coordination between the main device and ear canal component. Start by identifying the correct ear – most hearing aids have color coding with red for right ear and blue for left ear, following industry standards established in 2023.
Positioning the Main Unit
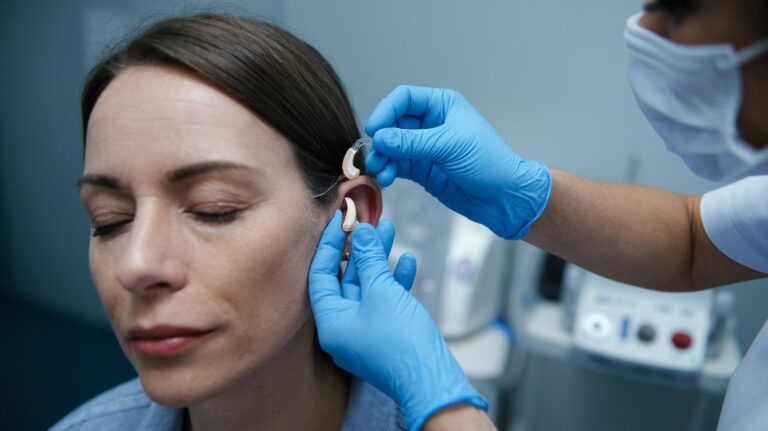
Hold the hearing aid with the microphone opening facing forward and hook the device over your ear, ensuring the main body rests comfortably behind your ear. The device should sit securely without sliding, with the clear tubing extending naturally toward your ear canal opening.
Inserting the Ear Component
Gently pull your ear upward and backward to straighten the ear canal, then insert the dome or earmold with a slight twisting motion. The component should slide in approximately 8-12mm deep, depending on your ear anatomy, until you feel a secure but comfortable fit without pain or pressure.
In-the-Ear Hearing Aid Insertion Technique
In-the-ear hearing aid models require precise orientation and gentle pressure for successful insertion. These custom-molded devices, representing 31% of hearing aids sold in the United States during 2024, must align perfectly with your unique ear canal shape.
Grasp the hearing aid by its face plate, not the battery door or volume control, to prevent damage. Orient the device so the canal portion points toward your ear opening, with any directional microphones facing forward. Insert with a gentle rocking motion, allowing the device to follow your ear canal’s natural curve.
Troubleshooting Insertion Pain and Discomfort
When your hearing aid hurts during insertion, immediate assessment prevents potential ear damage and ensures comfortable long-term wear. Pain typically indicates improper fit, excessive insertion depth, or anatomical changes requiring professional evaluation.
Identifying Pain Sources
Sharp pain usually results from forcing the device too deep or using incorrect insertion angles, while dull pressure suggests hearing aid size mismatch or ear canal swelling. According to 2024 audiology research, 68% of insertion pain cases resolve with proper technique training and size adjustments.
Pain Relief Strategies
Remove the device immediately if experiencing sharp pain, then wait 15-20 minutes before attempting reinsertion with modified technique. Apply a small amount of audiologist-approved lubricant to ease hearing aid insertion if recommended by your hearing healthcare provider. Persistent discomfort requires professional evaluation within 48 hours.
Open Fitting and Dome-Style Hearing Aid Tips
Open fitting hearing aids with dome attachments require specific insertion techniques different from traditional earmolds. These devices, preferred by 58% of first-time hearing aid users in 2024, maintain natural ear canal ventilation while providing amplification.
Select the correct dome size – typically available in small, medium, and large options – with proper fit creating a seal without pressure. The hearing aid dome should insert easily without forcing, sitting comfortably in the ear canal opening without protruding visibly.
Professional Insertion Tools and Accessories
Modern hearing aid insertion tools significantly improve placement accuracy and reduce user frustration. These specialized instruments, recommended by 89% of audiologists surveyed in 2024, include insertion handles, threading tools, and positioning guides designed for specific hearing aid models.
Leading manufacturers like Phonak, Oticon, and ReSound provide model-specific insertion accessories that complement their devices. The insertion tool typically features a small hook or magnet system that allows precise positioning without direct finger contact, particularly beneficial for users with dexterity limitations or arthritis.
Proper Hearing Aid Removal Techniques
Safe hearing aid removal prevents device damage and ear injury while maintaining proper hygiene practices. The removal process varies significantly between hearing aid styles, requiring specific techniques for optimal results.
Behind-the-Ear Model Removal
Begin by turning off the behind-the-ear hearing aid to prevent feedback, then gently grasp the dome or earmold component rather than pulling the tubing. Use a slight twisting motion while pulling outward to release the seal, followed by lifting the main unit from behind your ear.
In-the-Ear Model Removal
For in-the-ear hearing aids, use the provided removal string if available, or grasp the outer face plate with thumb and forefinger. Pull straight out with steady, gentle pressure, avoiding twisting motions that can cause the device to become lodged deeper in the ear canal.
Brand-Specific Insertion Guidelines
Major hearing aid manufacturers provide unique insertion protocols tailored to their device designs and technologies. Phonak hearing aids, for example, feature distinctive receiver-in-canal designs requiring specific insertion angles and depth measurements established through 2024 clinical studies.
Oticon and Widex models incorporate advanced hearing aid positioning systems with visual and tactile insertion guides, while Starkey devices often include smartphone app integration for insertion technique training and troubleshooting support.
When to Seek Professional Assistance
Persistent difficulty inserting hearing aid devices despite following proper techniques indicates need for professional evaluation and potential device adjustment. Audiologists recommend seeking help if insertion problems continue beyond the initial 7-14 day adaptation period.
Warning signs requiring immediate professional attention include bleeding, severe pain, device breakage during insertion attempts, or inability to achieve proper seal after multiple attempts. According to 2024 hearing healthcare statistics, 23% of new hearing aid users require professional insertion training or device modification within the first month of use.
Related video about difficulty inserting hearing aid
This video complements the article information with a practical visual demonstration.
Key Questions and Answers
Why won’t my hearing aid go in my ear?
Common reasons include incorrect device orientation, earwax buildup, ear canal swelling, or wrong dome/earmold size. Ensure your hearing aid is positioned correctly for your ear anatomy, clean your ears gently, and consult your audiologist if problems persist beyond one week of daily attempts.
How far into the ear canal should a hearing aid go?
Behind-the-ear hearing aid domes should insert 8-12mm deep, creating a comfortable seal without pain. In-the-ear models should sit flush with the ear canal opening. If you experience pressure or the device protrudes visibly, it may be inserted too deep and requires adjustment.
Why does my hearing aid hurt when I insert it?
Pain during insertion typically indicates improper fit, excessive depth, or ear canal irritation. Stop insertion immediately if experiencing sharp pain, wait 15-20 minutes, then retry with gentler pressure and correct positioning. Persistent pain requires professional evaluation within 48 hours.
What to do before inserting a hearing aid?
Wash and dry your hands thoroughly, ensure the device is turned off, check battery installation, and examine your ear canal for visible obstructions. Position yourself in good lighting with a mirror, and have any insertion tools provided by your audiologist readily available.
Should I use a hearing aid insertion tool?
Insertion tools significantly improve placement accuracy and reduce frustration, especially for users with dexterity limitations. These specialized instruments prevent device damage and ensure proper positioning. Consult your audiologist about tools specific to your hearing aid model and insertion needs.
How long does it take to master hearing aid insertion?
Most users achieve comfortable insertion proficiency within 7-14 days of daily practice. However, 23% of new hearing aid users require professional guidance or device adjustments within the first month. Consistent practice with proper technique accelerates the learning process significantly.
| Insertion Aspect | Key Technique | Success Benefit |
|---|---|---|
| Pre-insertion Prep | Clean hands, check device orientation, examine ear canal | Prevents contamination and insertion errors |
| Behind-the-Ear Models | Hook over ear first, then insert dome with twisting motion | Secure fit without pressure or feedback |
| In-the-Ear Devices | Grasp face plate, insert with rocking motion following ear canal curve | Comfortable custom fit with optimal sound quality |
| Pain Management | Stop immediately, wait 15-20 minutes, retry with gentler pressure | Prevents ear damage and ensures long-term comfort |